


Tag: IOT
Just a little Garden UI
This week I made a bit of progress with my garden monitoring system and figured out how to add a bunch of sensors connected to an ESP8266 that sends updates to my MQTT server. The hardwear is still being finished, but basically I am using four I2C expanders to add 16 Analog inputs to the NodeMCU along with a few other sensors attached to digital pins. This is all solar powered and I just got a controllable watering system that is working well. I will cover all of that once I have my system up and running.
Today I have been playing around with Home Assistant to make the user interface that I will use to help figure out and test automations later.
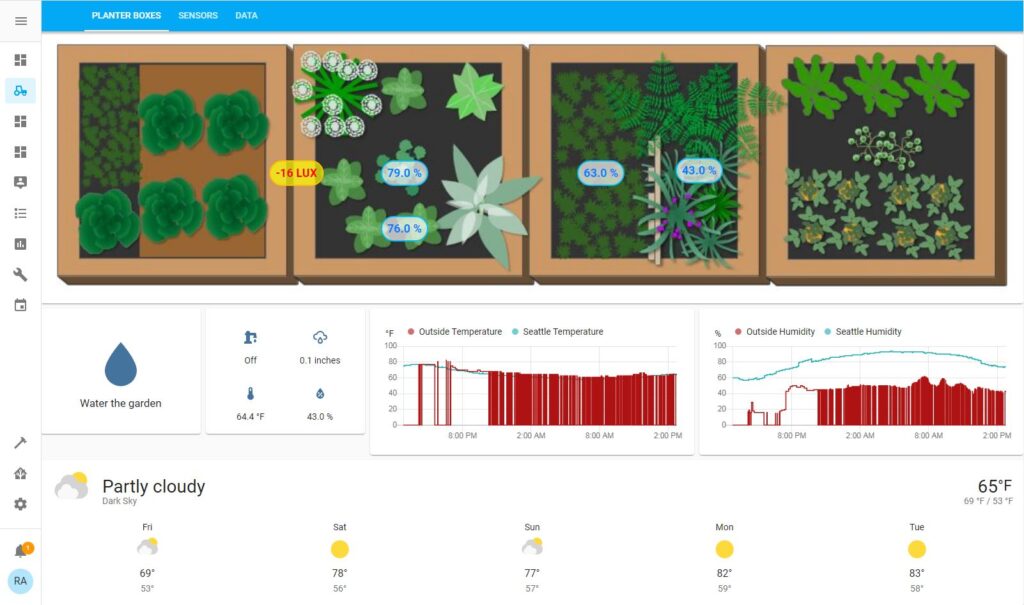
The first tab is a basic overview of the planter boxes with sensor data displayed over the aria that the actual sensor is placed. This also has a button to run a script that pulses water to the garden boxes so that the soil soaks up the water and a switch that lets you manually control the water pump. Though the pump switch is just for my testing because if you just turn the pump on it tends to flood the boxes that lets a bunch of water dripping out from the bottom and it is better for the script to pulse water over time. After that there is a graph with local weather report data along with data from my DHT11 sensor and the forecast for the week.
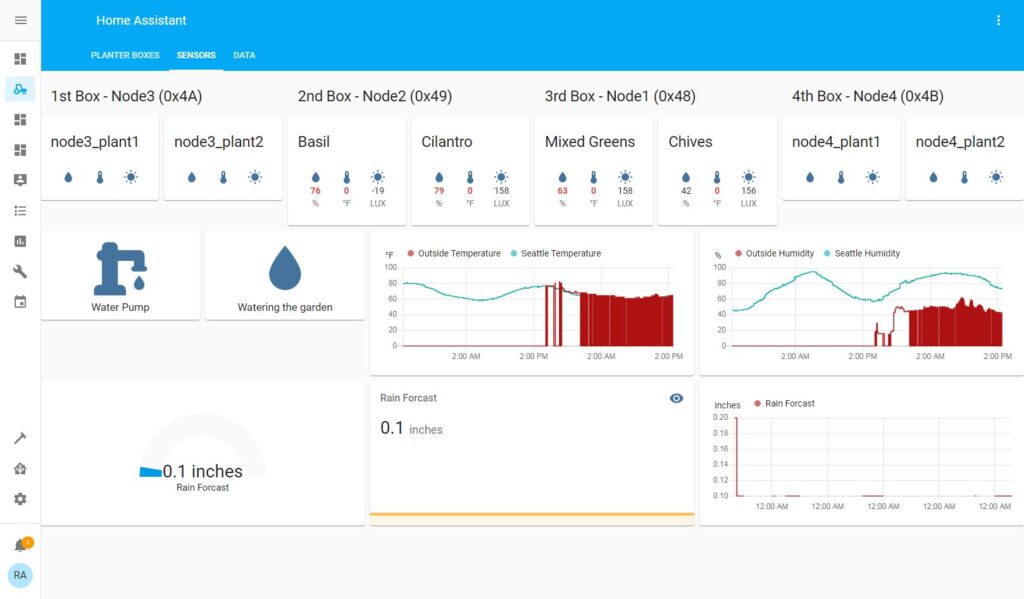
The Sensors tab shows each of the sensor readings using the Plant Status cards for Lovelace so that I can set alert triggers later for things like low water levels, freezing temperatures, or over exposure to sunlight. This tab also shows predicted rainfall for the day in inches. This information will be used to tell the system if it needs to water the garden or let nature do its thing.
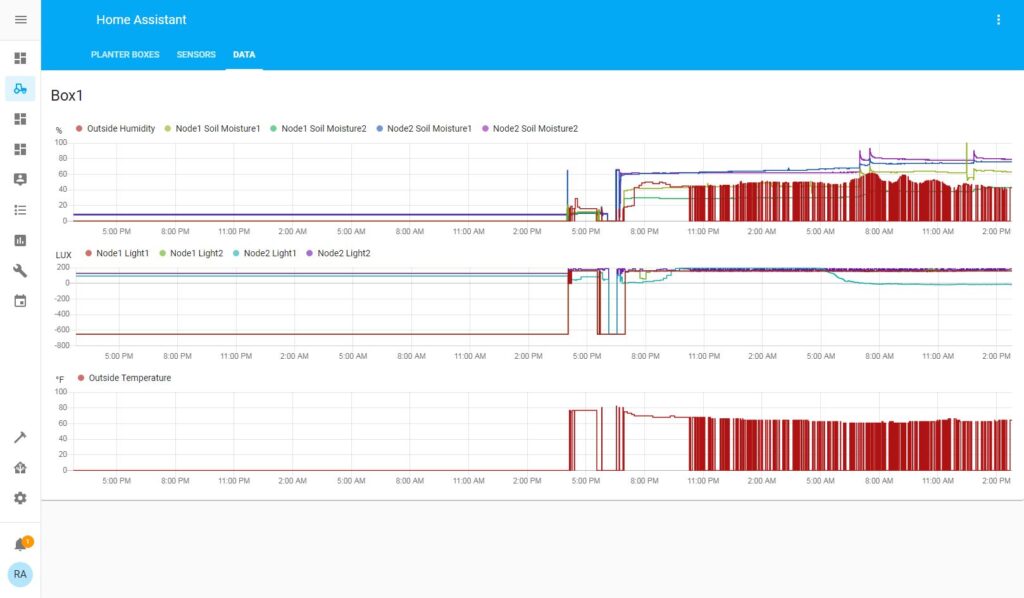
Now we get to a lovely display of data graphing that would make any researcher proud. The first graph compares the air humidity with the soil humidity for the last 48 hours so you can see how the day’s heat affects the soil moisture. If you look closely on the right side of this graph, you can see two spikes where the water pump did it’s thing. The next graph is for the light sensors, but I only have one connected right now. The last graph will show the soil temperature for each of the planter boxes as soon as I get those wired into the ESP8266.
Later I will be adding a water level sensor that tells me to fill the water tank and will not let the pump run if the water level gets below the pump’s intake level.
I am hoping to have more about this project later next week including how I built the electronics and 3D printed a solar radiation shield to get more accurate weather data.
Garden Data Logging with Adafruit IO
I threw together a sensor node to collect some more detailed soil moisture data in my planter boxes. This is using an ESP32 with 3 capacitive soil moisture sensors. I connected that to Adafruit IO to collect and graph the data.
CircuitPython Connected Weather Cloud Lamp
This tutorial was created for Adafruit’s Learning Guide system. Click the link below to see the guide.
PyPortal MQTT controller
This tutorial was created for Adafruit’s Learning Guide system. Click the link below to see the guide.
Set up Home Assistant with a Raspberry Pi
This is a detailed guide for beginners to install and setup a home automation server using a Raspberry Pi and Home Assistant. Continue reading Set up Home Assistant with a Raspberry Pi
Bluetooth Circuit Playground What!
So anyone who has worked with me knows that I am a huge fan of Adafruit’s Circuit Playground development boards. It has been a huge help in getting people started with programming hardware because you can do so much with it before you even start plugging in other things.
I was so excited when they came out with the CP Express because now I could use Blockly to help even younger hardware developers on their way to making cool things. However, the MicroBit did offer a few more tantalizing options that made me choose it over the CP Express. Now it is hard to compare the two platforms because they both have a lot of value in different ways, but the one thing that stood out about MicroBit was Bluetooth Low Energy. The CP Express has IR communication and that is nice, but it is only line of site and that makes it hard to do projects that would involve networking. So the MicroBit typically would win out with projects that needed wireless communication.
Now with the introduction of CP Bluefruit this issue is solved an so many ways. I could see this coming based on some posts and a demo a few weeks ago on Ask an Engineer, but I was not sure if there would be a price increase with the new BLE support. Well it looks like not only is there no change in price, but the jump from and M0 to M4 Cortex processor makes this thing even more powerful as well.
I am supper excited about the idea of doing IOT workshops where the students get to program the devices that get networked. Basically this makes every CP Bluefruit into a smart light with a host of sensors on them. This could help students design and code puzzles for an escape room project… so many cool things that this can do now that is has BLE.
For now this is an Alpha version of the CP Bluefruit and that means that some hardware may change, but it is working for Arduino IDE and Circuit Python. Hopefully they will have a Blockly option soon as well. Not really time to start getting these for schools yet, but worth testing out as an early adopter and to keep an eye on for the near future.
More Info: