


If you can not connect MediaWiki with your MySQL password and user name, do the following steps. Continue reading Can’t get MediaWiki to connect to MySQL using root password.
Category: Tutorials
Setting up a Pi Zero W
Intro
The Raspberry Pi Zero W is super good for a lot of projects and at $10 you can not do better than this mini Linux computer. However, it can be tricky to get things going due to the lack of Ethernet or full sized HDMI or USB port. You can get adapters, but we don’t need them anyway. Continue reading Setting up a Pi Zero W
IOT Holiday Lights
This tutorial will walk you through setting up a string of colorful holiday lights that connect to the internet. The lights can display many types of animations and colors based on information sent to it using Adafruit’s IO service. Once connected and programmed, IFTTT can be used to set date triggers as well as change animations based on your GPS location, the weather report for the day, and even when you are getting a call from your mother.
The hard stuff is already done and with just a bit of soldering and a few code edits, you will be deep into the beast known as the Internet of Things. Continue reading IOT Holiday Lights
Adding ESP8266 support to Arduino IDE
This will help you to add hardware support for programming devices that use the ESP8266 WiFi connected micro controllers. Continue reading Adding ESP8266 support to Arduino IDE
Installing Home Assistant with HASSbian
Home Assistant is one of the most versatile and powerful home automation platforms and it is complacently open source. Once set up, it can be accessed from any web browser and allows your to create complex automation that put services like IFTTT to shame. Continue reading Installing Home Assistant with HASSbian
First test game at PBLI

We got Midnight Carnival finished enough to do a game with some of the staff. Not everything was working 100%, but everyone had a lot of fun. 20K is next 🙂
App Inventor and Particle
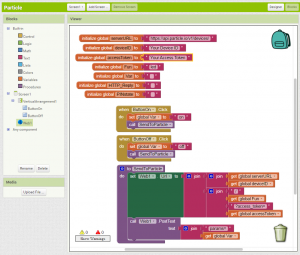 This is set up to work with the WEB-Connected LED example app for the Particle Spark, Photon, or Electron. Continue reading App Inventor and Particle
IOT Holiday Lights
#include "application.h"
#include "neopixel/neopixel.h"
SYSTEM_MODE(AUTOMATIC);
// IMPORTANT: Set pixel COUNT, PIN and TYPE
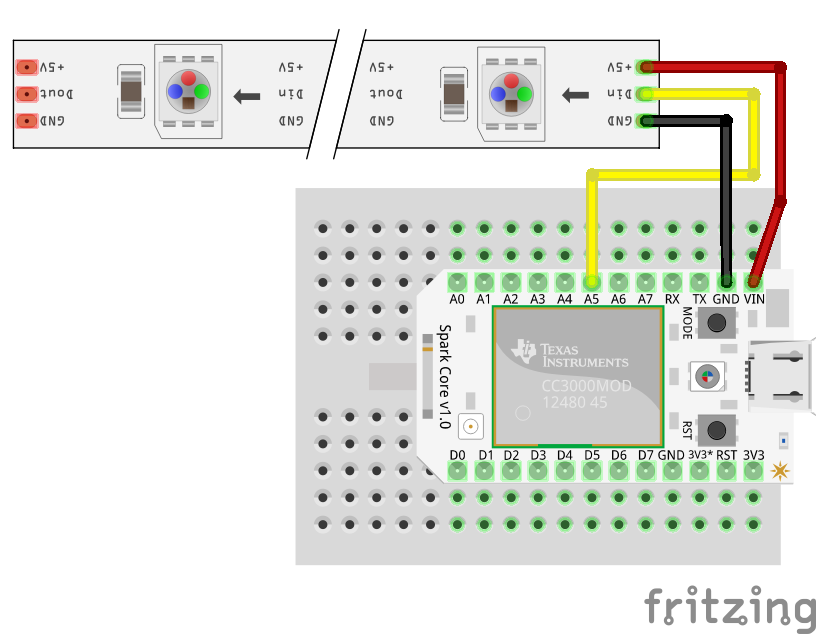
#define PIXEL_PIN A5
#define PIXEL_COUNT 11
#define PIXEL_TYPE WS2812B
Adafruit_NeoPixel strip = Adafruit_NeoPixel(PIXEL_COUNT, PIXEL_PIN, PIXEL_TYPE);
int show = 0;
int flash = 0;
void setup()
{
strip.begin();
strip.show(); // Initialize all pixels to 'off'
Spark.function("led",ledToggle);
}
void loop()
{
switch (show) {
case 0: // your hand is nowhere near the sensor
off();
break;
case 1: // your hand is on the sensor
rainbow(30);
break;
case 2: // your hand is close to the sensor
theaterChaseRainbow(700);
break;
case 3: // your hand is a few inches from the sensor
purple();
break;
}
delay(1); // delay in between reads for stability
}
int ledToggle(String command) {
if (command=="off") {
show = 0;
return 0;
} else if (command=="on"){
show = 1;
return 1;
} else if (command=="chase"){
show = 2;
return 2;
} else if (command=="purple"){
show = 3;
return 3;
} else if (command.indexOf("today") & command.indexOf("wind")){
int firstComma = command.indexOf(',');
int secondComma = command.indexOf(',', firstComma + 1 );
purple();
}
delay(1); // delay in between reads for stability
}
void rainbow(uint8_t wait) {
uint16_t i, j;
for(j=0; j<256; j++) {
for(i=0; i<strip.numPixels(); i++) {
strip.setPixelColor(i, Wheel(((i * 256 / (strip.numPixels()/3))+j) & 255));
}
strip.show();
delay(wait);
}
//if (flash == 1){
// flash=0;
//} else {
// flash++;
// }
}
void purple() {
uint16_t i;
for(i=0; i<strip.numPixels(); i++) {
strip.setPixelColor(i, strip.Color(100,0,100));
}
strip.show();
}
void off() {
uint16_t i;
for(i=0; i<strip.numPixels(); i++) {
strip.setPixelColor(i, strip.Color(0,0,0));
}
strip.show();
}
//Theatre-style crawling lights with rainbow effect
void theaterChaseRainbow(uint8_t wait) {
for (int j=0; j < 256; j++) { // cycle all 256 colors in the wheel
for (int q=0; q < 2; q++) {
for (int i=0; i < strip.numPixels(); i=i+2) {
strip.setPixelColor(i+q, Wheel( ((i * 256 / (strip.numPixels()/2))+j) % 255)); //turn every third pixel on
}
strip.show();
delay(wait);
for (int i=0; i < strip.numPixels(); i=i+2) {
strip.setPixelColor(i+q, 0); //turn every third pixel off
}
}
}
}
// Input a value 0 to 255 to get a color value.
// The colours are a transition r - g - b - back to r.
uint32_t Wheel(byte WheelPos) {
if(WheelPos < 85) {
return strip.Color(WheelPos * 3, 255 - WheelPos * 3, 0);
} else if(WheelPos < 170) {
WheelPos -= 85;
return strip.Color(255 - WheelPos * 3, 0, WheelPos * 3);
} else {
WheelPos -= 170;
return strip.Color(0, WheelPos * 3, 255 - WheelPos * 3);
}
}
Create G-Code from an EAGLE File
Overview
Prototyping a circuit board in this way is a good idea so you can be sure that things are working before sending your PCB off to a fabricator. This method is also a good way to do low run or one off testing PCBs.
G-Code is made up of some simple commands that tell a CNC mill how to move so that your designs come out correctly. This is also called a Tool Path. PCB-GCode is an add-on for EAGLE that lets you create a Tool Path in G-Code so that it can be made by a CNC Mill like my Shapeoko 2. Though there are many ways to create G-Code for PCBs, I will focus on EAGLE and PCB-GCode because they are rather easy to use and the software is free for making basic PCBs Continue reading Create G-Code from an EAGLE File