


This is a detailed guide for beginners to install and setup a home automation server using a Raspberry Pi and Home Assistant. Continue reading Set up Home Assistant with a Raspberry Pi
Asides
Crickit Micro:bit Robot Tutorial
This full tutorial now lives in Adafruit’s Learning system. Use the links below to build your own Micro:Bit Robot friend.
Go to the Micro:Bit Crickit Robot guide
Download the PDF version of Micro:Bit Crickit Robot guide
Wireless NAT server E-ink badge with Apache, PHP, SQL, Media Wiki, and MQTT
Intro
This will walk you through setting up a Raspberry Pi Web server with Raspbian Buster Lite. The following services will be installed and available by the end of this tutorial.
- Apache web server
- MySQL database
- PHP
- MediaWiki
- MQTT
Continue reading Wireless NAT server E-ink badge with Apache, PHP, SQL, Media Wiki, and MQTT
Can’t get MediaWiki to connect to MySQL using root password.
If you can not connect MediaWiki with your MySQL password and user name, do the following steps. Continue reading Can’t get MediaWiki to connect to MySQL using root password.
Setting up a Pi Zero W
Intro
The Raspberry Pi Zero W is super good for a lot of projects and at $10 you can not do better than this mini Linux computer. However, it can be tricky to get things going due to the lack of Ethernet or full sized HDMI or USB port. You can get adapters, but we don’t need them anyway. Continue reading Setting up a Pi Zero W
IOT Holiday Lights
This tutorial will walk you through setting up a string of colorful holiday lights that connect to the internet. The lights can display many types of animations and colors based on information sent to it using Adafruit’s IO service. Once connected and programmed, IFTTT can be used to set date triggers as well as change animations based on your GPS location, the weather report for the day, and even when you are getting a call from your mother.
The hard stuff is already done and with just a bit of soldering and a few code edits, you will be deep into the beast known as the Internet of Things. Continue reading IOT Holiday Lights
Adding ESP8266 support to Arduino IDE
This will help you to add hardware support for programming devices that use the ESP8266 WiFi connected micro controllers. Continue reading Adding ESP8266 support to Arduino IDE
Installing Home Assistant with HASSbian
Home Assistant is one of the most versatile and powerful home automation platforms and it is complacently open source. Once set up, it can be accessed from any web browser and allows your to create complex automation that put services like IFTTT to shame. Continue reading Installing Home Assistant with HASSbian
App Inventor and Particle
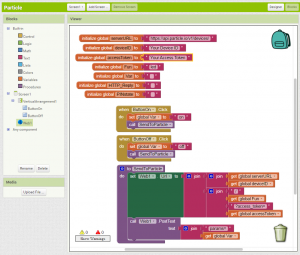 This is set up to work with the WEB-Connected LED example app for the Particle Spark, Photon, or Electron. Continue reading App Inventor and Particle
Low Carb enchiladas… kinda
Emily and I are trying out low carb. While I do miss potatoes and crackers, it has forced me to be a little creative with my cooking.
A friend gave us a recipe for this crackpot pulled pork soup that used enchilada sauce. Well I am done eating just meat soup so I decided to try making enchiladas.
I won’t really get into the filling part of this since you could use whatever. Slow cooked and seasoned chicken, beef, pork, fish, or even Tofu would work. Once your meat has cooked, you will want to boil a head of cabbage. Be sure to boil the entire thing because we want the leafs intact. This will likely take one hour in a large pot of water.

With a spoon, try and separate the leafs in the pot to help cook the innermost leaves. I used purple cabbage just because it looks nice, but any type would do.

Drain out the water when the leafs are nice and tender, then rinse them off in cold water so they are easy to handle. These leafs will be used as your enchilada wrappers.

Scoop about 2 large spoon fulls of filling into one of the cabbage leafs. Be sure to leave more room on once side to wrap the filling up with.


Place your wrapped enchilada into a baking dish. Place these into the dish with the overlapped part of the cabbage leaf facing down.

Once you have a few of these packed into the dish, it’s time to add some cheese. Emily loves the cheese. We used Jack cheese for this one, but cheddar or whatever will work.

Now it’s into the oven with you. Bake for one hour at 400° should do it.

You will want to check on things just before the hour is up. You want to see bubbly cheese with a bit of browning on top.
Let that cool for at least 5 minutes, then add sour cream and chow down. The cabbage leafs should be tender enough to cut with a fork.
We made a larger dish for weekday lunches.